Frequently Asked Question
[Setup and Basics] How to Set Up Your Marketplace?
Last Updated 7 years ago
Repricing Central
Feedback Central
Repricing Central
We have improved the process of approving BQool as your service provider for your Amazon Store. There are 2 Easy Steps to complete the MWS access authorization.
Step 1.
After you have activated your BQool account, you will need to enter your Store Name and select the Marketplace you wish to trial. Then click Connect to Amazon to access the Seller Central.

Step 2.
Login to your Seller Central with the popup window. Check off the "I understand" box and click Next.
Please click Continue button to complete the authorization.

You're all set to go!
Email us at support@bqool.com if you have further questions regarding the MWS issue.
BQool Application Developer Account Number
- Amazon US, CA, & MX: 6520-9041-4559
- Amazon EU (UK, DE, FR, ES, IT): 5013-3213-1114
- Amazon JP: 0243-8352-9264
Note: It could take a couple of hours to download all of your Amazon Seller Account data.
Feedback Central
How to Setup Feedback Central Marketplace
Step 1: Connect to the Amazon Store
We have updated the process of approving BQool as your service provider for your Amazon Store. There are 4 Easy Steps to complete the MWS access authorization.After you have activated your BQool account, you will need to enter your Store Name and select the Marketplace you wish to trial. Then click Connect to Amazon to access the Seller Central and follow the rest of the procedure.

Step 2: Setup Approved Sender Email
Before you contact customers with BQool, make sure the email address you chose to use is registered as an approved sender on Amazon. Otherwise, Amazon blocks your email, preventing it from reaching your customers.Please follow the steps below to register your email with Amazon. Please navigate to Feedback Central> General, where you can find your personal BQool email.
Please Copy BQool Email

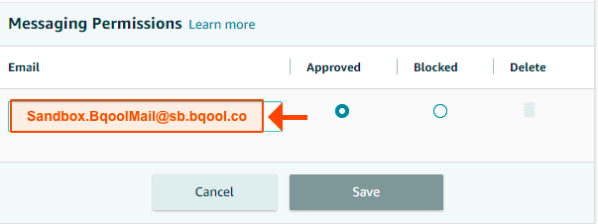
Sign in to Seller Central & add "Approved sender."

Please find message permission then click on ”Add an Email Address. “ Next, paste the BQool address and select approved & click save.”
Step 3: Setup Messaging Email
Please copy BQool Email first.
Secondly, sign in to Seller Central & add BQool email

Lastly, find "Messaging", click "Edit". Add BQool Email to the four columns below:
1. Buyer Messages
2. Confirmation Notifications
3. Delivery Failures
4. Buyer Opt-out
t

That’s it! You can now start to manage or customize your Email Campaign.