Frequently Asked Question
[Setup and Basics] Getting Started: Feedback Central
Last Updated 7 years ago
- How to Set Up Your Marketplace
- Repricing Central
- Feedback Central
- Review Central
- Manage Orders
- My Account
- Dashboard
- Reports
Getting Started: Feedback Central
Managing Campaign
You can start sending emails by setting the Sample Campaigns to Active under Status.In the Feedback Central 2.2, the previous default campaign has now been replaced with Sample Campaign to provide a more intuitive test environment for brand new users to help them to complete email tasks efficiently. You can find the Sample Campaigns on the left menu.

You can further update or revise the information on the Settings tab by clicking on the edit icon.

You can also set a campaign to Inactive to pause outgoing emails, or only send out the Test email to your own email address by setting the campaign to Test.

Click on Actions to:
- View / Edit: View the default campaign or edit the campaign you created
- Copy: Create a copy of the campaign
- Delete: Delete the campaigns you createdf
- Move to Folder: Organize your campaigns
Add New Email Campaign for more details
Our system has included several default email Campaigns for you upon signup. However, you’re always welcome to create your own email Campaign.
You can create a new campaign by clicking Add New Campaign or edit a previously created campaign by clicking Actions > Edit. Clicking on either of these options will allow you to view the campaign settings.

Under the campaign setup interface, there are five steps:
Step 1 Setup: You will need to enter a Campaign Name and Campaign Description. We recommend that you set the Campaign Status as Test at first. Also, set up your sender email. Make sure the email you enter is registered as an approved sender with Amazon. Otherwise, Amazon will block the email, and the buyers will not receive it.
Step 2 Template: There are a number of email templates and background themes to choose from for the new Campaign.
- Email Templates - Choose the blank template to start from scratch or copy and paste a template that you already own. Otherwise, select the template that best suits your needs. For the EU marketplaces, you will be able to select the templates from 5 different languages.

- Background Themes - Pick the most suitable design for your email campaign.
- Saved Template - You can choose from one of the templates that you have previously saved.
Step 3 Content: Whether you decide to use your own template or select from one of our templates, there are three key tools under the content step that make your email campaign stand out.

After you are satisfied with the subject line and email body, you can use the following tools to further improve your campaign
- Variables - You can insert variables into the email to display specific information for the individual buyer. We grouped variables into six categories. Please click on the category to expand the variable lists
- Attachment - Popular attachments to send to buyers are often recipe books and user manuals. Please refer to the upload guideline:
- You need to first upload the file using the blue + logo
- Click on the attached file to insert the file into your email body
- The file name should show up as a variable
- Save as Template - If you like this email template, save it as a template for future use
Step 4 Filters: There are many filters available to target more specific customers. Please remember to select the correct options after turning on the Filter.
There are three other events located when you click on the right side of the filter list or as seen in the picture below that will automatically send the campaign emails to the buyers. Only one event can be turned on for the same campaign.
Remove Negative Feedback: Automatically send an email after a customer leaves a negative feedback (one and two stars)
Remove Neutral Feedback: Automatically send an email after a customer leaves a neutral (three-star) feedback
Late Shipment: Automatically send an email if a shipment is due to arrive late. You can set when to send the email according to the order date.

Note:
There are two filters that require extra authorization from Seller Central account as seen below. Please refer to the Positive Feedback Integration support article for details.

Step 5 Schedule: There are three settings you can select for your campaign schedule.
- Fulfilled By Amazon (FBA) Orders (Delivery option is only available for FBA orders)
- Fulfilled By Merchant (FBM) Orders
- Email Delivery Time: as soon as possible or a fixed time for a particular time zone; The country and time zone will only appear on the page after a time is selected.

Lastly, please do not forget to Save Campaign when you are done. Unlike the Default Campaigns, the Campaign that you created or copied can be edited at any time.
Emails page for more details
Emails - Campaigns
Go to Feedback Central > Emails > Campaigns to see a list of pending emails that are due to be sent.Under the Email Send Date column, you can see when the emails are scheduled for sending.
The Email Summary at the upper right will show how many emails you have sent, and how many emails you have available to send.
Monthly Annually


A message next to Campaigns will also show how many emails were sent yesterday, and how many is scheduled to be sent today.
Click on Actions to:
- View Email: View the content and format of the email
- Send Email: Send the email right away
- Block Email: Cancel this email. This email will be moved to the Blocked Email folder. (See below)
- Delete Email: Remove the email completely
- Add Buyer to Blacklist: Add buyer to the Blacklist. The buyer will no longer receive any emails
Learn more about the Buyer Blacklist

You can view different kinds of emails by using the drop-down filter at the upper left. You can choose to see:
- Pending Email
- Opt-out Email: In this section, you would be able to see a list of emails that were not received by your customers. There are three reasons as to why the emails failed to send:
1. Your customer set up opt-out option in Amazon.
2. Your customer’s email server thinks your emails are spam.
3. Amazon thinks your emails are spam.
In order to test which reason it is, you may try to manually re-send the emails one at a time. This will space out the delivery time and avoid the third reason. - Blocked Email: Here you are able to View Email, Unblock Email and Delete Email.
- Sent Email
In addition, with the new Campaign Email Filters, you can quickly find or filter email using the following criteria:

Emails - VAT
* It is only available for the EU marketplaces with $50 or above subscriptionGo to Feedback Central > Emails > EU VAT Invoice to manage your VAT emails. The features here are the same as in Campaigns section.
Settings - General
General

Go to Feedback Central > Settings > General to access settings for emails, notifications, and Feedback Status.
- Approved Sender Email: put in the Amazon approved sender email address in here. It will not affect the previously created or Default campaigns. It will only apply to the newly added campaign.
- Amazon Store Name: Manage the name of your Amazon storefront
- Upload Store Logo: Upload a picture of your company or storefront logo. This will be shown in your emails
- Send Test Email to: Specify which email address to send test emails to
- Test Email Daily Limit: Set a limit on how many test emails you can send daily
Email Notification
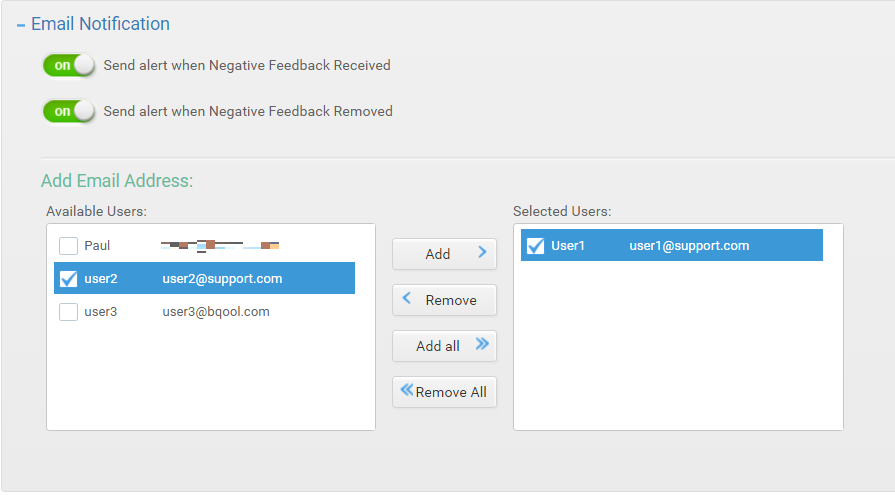
You can set alert settings under Email Notification. You can also add emails of people who are going to be receiving alerts. Choose the email address under 'Available Users' and click Add > to move it to the right as a 'Selected User'. Only 'Selected Users' will receive email notifications.
Feedback Status
If you'd like, you can change how Feedback Central marks new Feedback under Feedback Status. Please open the Feedback Status option and set up the status, for example, you can choose to mark 1 and 2 star feedback as Open, and 3 star feedback as Closed. Please remember to Save after you are done.Positive Feedback Integration

You can integrate your Seller Central with BQool to have your positive feedback downloaded and also exclude orders that already have positive feedback in your email rules.
***Note: Please use another email login to grant access to BQool***
>>> Link to setting up Positive Feedback Integration